To create a new appointment:
- Select Associate > Appointments > Add. The Add Appointment window will appear.

Fields and options in the Add Appointment window include:
|
Associate
|
Offers the Associate drop-down menu; use it to assign the task or appointment to an associate.
|
|
Customer
|
Offers the customer find filter to indicate the customer. This is required to proceed with further contact information.
|
|
Contact Method
|
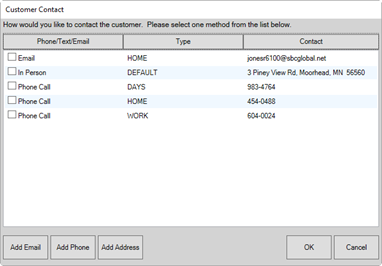
Offers the method contact window:
For each contact type, there may be more than one contact method. Select the correct phone number email address, or store location.
|
|
Appointment Type
|
Allows you to categorize appointments by type:
- Registry
- Service
- Wish List
- Sales Opportunity.
|
|
Details
|
Allows you to record details about the task. It should be a succinct description of the task as it will appear in the list view.
|
|
Priority
|
Indicates the priority of the contact on a scale of High, Medium, or Low.
|
|
Dates
|
You have the option to enter a specific, single time to fulfill the appointment, enter a date range, or enter a time range on a particular date. The options for entering those details change according which radio button you select:
- Single Time: Select a date from the date picker and select a time in 30-minute intervals from the drop-down menu.
- Date Range: Begin Date and End Date fields will be offered; select accordingly. No time frame is recorded, but The Edge will store the time as 12:00 a.m.
- Time Range: Begin and end dates will be offered, but you can also pick times.
|
|
Initial Notes
|
Notes concerning the purpose of the contact, information about items or transactions to be discussed, etc. There is space to be detailed here; you can include item numbers, descriptions, etc. This information will not appear in the History area of the appointment record.
|
- Select an associate.
- Select a customer.
- Select the Contact Method drop-down menu. The Customer Contact window will appear.

- Select the type of contact with the desired value from the available options.
- Select OK. You will be returned to the Add Appointment window. The Contact Method and Contact Address will be populated.
- Complete the remaining fields and select OK/Save & Close. The appointment will be saved and the window will close.
- When you are ready to act on the appointment, find it as described in the section entitled Finding an Appointment.