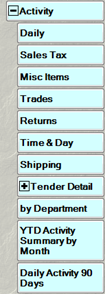
Memorized reports appear in the Reports window navigation bar. By default, reports will be saved at the bottom of the Reports menu for that report section.
For example, if you created a report based on any of the Activity reports, your memorized report will be saved at the bottom of the Activity reports list.
To change how those items appear and manage other settings:
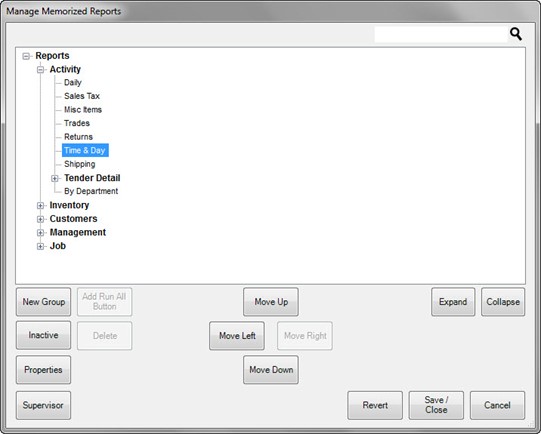
- Select Administrative > Manage Reports Menu. The Manage Memorized Reports window will appear.

The hierarchy of reports shown will mirror what is shown in the main Reports window. Also notice that the reports you created are in italics. What you arrange here is what will appear in the Reports window.
Options in the Manage Memorized Reports window include:
|
Expand
|
Expands the hierarchy to show the whole list of reports.
|
|
Collapse
|
Collapses the hierarchy to show only the top-level list.
|
|
New Group
|
Allows you to create a new category of reports.
|
|
Add Run All Button
|
Allows you to add a button to the Reports menu to run all reports in that section.
IMPORTANT!
This is a lot of reporting and will consume system resources for some time!
|
|
Inactive
|
Allows you to mark the report inactive so it will not appear in the Reports window. It is saved, however. You can mark it active at a later time.
|
|
Delete
|
Deletes the report.
|
|
Properties
|
Shows the settings for the button, but does not permit editing of the report filter.
|
|
Move Up/Move Down/Move Left/Move Right
|
Allows you to move the memorized report button relative to others in the hierarchy. For example, to place a button in the Activity report section, move it up to the Activity section, select Move Right or Move Left to position it under a different level.
|
|
Import
|
Allows you to import memorized reports exported by The Edge or other stores.
TIP!
After importing a memorized report, they will appear at the bottom of the hierarchy in Imported Reports.
|
|
Export
|
Allows you to export memorized reports for use in sharing with other stores.
|
|
Revert
|
Reverts the hierarchy to the state it was in since the last save.
|
|
Save/Close
|
Saves the changes made to hierarchy and closes the window.
|
|
Cancel
|
Closes the window without saving changes.
|
- Make changes to the structure as desired and select Save/Close. The Report will reflect that structure.

NOTE: To erase memorized reports and go back to the pre-packaged reports, select Administrative > Manage Reports Menu > Supervisor > Reset Reports to System Defaults.
Creating Groups of Reports
To create a group of reports to run regularly:
- Create the reports to be run in the group. For each one, decide whether they should run without further filtering using the Run Report without a User Interface option.
- Using the Administrative > Manage Reports Menu, select Create Group.
- Name the group as desired.
- Using the Move Up/Move Down/Move Right/Move Left buttons, move the group to the desired location in the hierarchy, then move the newly memorized reports under the group.
- Optionally, add a Run All button under the group.
 The Run All command will apply to the group under which it is located. If it is at the top of the hierarchy, it will run ALL!
Changing the Report Button Properties
To change memorized report button properties (not report filters):
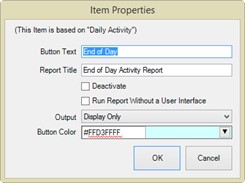
- Using the Administrative > Manage Reports Menu, select the report and select Properties.

- Make changes as needed and select OK.
Changing the Criteria of a Memorized Report
To change a memorized report:
- Be sure the Run Report without a User Interface option is not turned on.
- In the Reports menu, find and select the memorized report to be changed.
- When the report filter appears, make changes as required.
- Do not select OK to run the report. Select Presets > Set as Default.
- Select OK if you wish to run the report.
- If desired, re-enable the Run Report without a User Interface option.